Welcome to My Blog!

Hi! Thanks for visiting! If you have a blog or other favorite website you'd like me to check out, let me know! And, please, comment on my posts--I'd like to hear from you.
--Ms. Molly


Tuesday, March 26, 2013

Configurations Vacation Book

I thought I'd surprise my friend Teresa on her birthday with a scrapbook/shadow box from our road trip to the Gulf Coast last year.  Her birthday was a month ago, so it really is going to be a surprise.  Anyway, here's the end result:
Most everything is either from CTMH or Tim Holtz.  My basic idea came from the book Tim Holtz showed during the CHA show this winter.  The newspaper-like tape on all edges is Tim Holtz.  The papers are all CTMH:  mostly the "Surf's Up" paper pack with a little bit of "Dakota" (the worn boards paper).  All the stamps are CTMH.

This is a view of the inside of the box.  I like that it's a shadow box so you can add shells, matchbooks, and other 3D objects, but it still has a cover, so if we don't want to display it, it slides onto a book shelf nicely.
Here's what the Configurations Book looks like when you get it--naked.  You can move the boxes around in any order you want or remove some, but I liked the original pattern.  Next I covered the edges of every box with Tim Holtz tissue tape:
And all the other edges of the Configurations Book:
Next, I covered the flat surfaces with patterned paper.
Cut the paper just short of the length/width of the book, so the tape shows around the edges.  I also distressed all the edges of every piece of paper.  I added ribbon around the book for a bow closure.  I glued it under the paper on the cover and on top of the papers on the back and spine.
The back of the book with the ribbon on the outside.
The ribbon on the spine of the book.
I used different coordinating patterns for the backgrounds of the boxes.  I glued the three shells on their respective boxes with CTMH Liquid Glass.  There's also a matchbook and a bit of letterhead from hotel stationery.
Here are all the photos added.  I also included some CTMH embellishments from the Surf's Up pack.  The large box on the right is for a mini book.
I made sure the cover was flat, because I want it to fit on a bookcase without being damaged.  The pennants are a SU punch, but I used CTMH paper.  The baker's twine is glued behind the pennants, but they hang free at the ends.  The words & numbers are all CTMH stamps.
This is the little mini book inside the cover.  I made the "door handle" out of a square button and a bead, which I affixed with Liquid Glass.  I was careful that the door handle landed in the center of a box on the right side, so the book would still close.  I made the book with several pieces of cs, scored down the left side and stacked and glued down the left side.
I added pictures from each day of the trip on the inside, along with some coordinating stamping, and computer-printed journaling.  I couldn't help but add a picture of me & Tom with a note that we are some of the "most awesome friends ever."
I included pictures of some of the favorite food and drinks from the trip to give a complete feel of the vacation.  You can see the embellishments at the top of the inside cover, which fit inside a box to the right when the cover is closed.
 
I like to use white colored pencil to highlight stamping on darker papers.
 
 
 Here's the mini book on the right side.  Again, it's just a few pieces of cs scored and taped together along the top.  The embellishments and stamps are CTMH.
Two holes in the top of the book make it slip right over these hooks.  I can't remember their exact name, but they're Tim Holtz Ideaology pieces.
I didn't permanently secure the book, so it still slides off the hooks in case my friend wants to do some of her own journaling in here.
And the inside of this book.  Plain, but I thought I need to leave her some journaling areas too. 
 
 
(I can't get over Mark eating those raw oysters--Yuck!)
 
Here's some more pics of the finished project: 

I didn't glue down the individual boxes.  You could, but they stay in pretty well by themselves.
You can see in this photo that all my tape isn't sticking down perfectly.  That doesn't really bother me.  I like the look with the wrinkles and loose bits.  It could be remedied with some white glue or more careful taping technique, if the messier look isn't your style.
 
It did take some time, but this was a really fun project, and I plan to do more.

Saturday, March 23, 2013

Schrader Family Angel Food Cake

My mom makes the best angel food cake.  The recipe actually came from my dad's family, and they taught my mom, because it was my dad's favorite cake.  My sister Mary and I went to the farm this morning, and my mom gave us a lesson.  Mary did all the work, and I took pictures and notes.  Here's the recipe:

1 1/4 Cup fresh egg whites at room temperature
1 1/4 Cup cake flour
1 1/2 Cup sugar (1/2 Cup & 1 Cup)
1 1/4 tsp. cream of tartar
1 tsp. vanilla extract
1/4 tsp. almond extract

*Separate eggs until you have 1 1/4 Cup egg whites.  Going over 1 1/4 Cup is fine if the last egg you separate makes a little too much.  Don't be under.  Set aside.
 
(Mary didn't separate the eggs to suit me, so I butted in and tried to show her how to do it over her shoulder.  Of course I dropped my entire egg into the egg whites, but the yolk didn't break, so I was okay.  While fishing out the yolk from the whites, I broke it and ruined all the whites Mary had separated to that point.  That's when I sat down and started taking notes instead of helping her.)

*Sift the cake flour.  Then measure out 1 Cup plus 2 Tbsp. of the sifted flour.

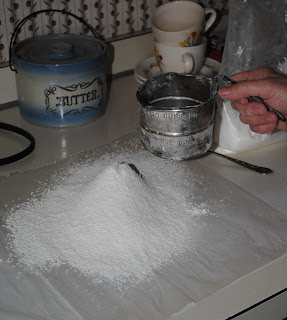
*Sift the (1 C-2 Tbsp) flour together with 1/2 Cup sugar.  Sift and dump back into the sieve Four Times.  Set aside.
(That's my mom's sieve.  It "has character."  Mom thinks it's easiest to sift onto waxed paper, then dump it back into the sieve and repeat three more times.  Yes, that's an antique butter crock in the background.  I think it holds sugar.  My mom is the only one allowed to open it because she's afraid someone will break the lid, which is apparently rare to be undamaged.)
 
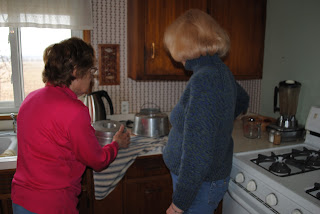
(This is my mom critiquing my sister's sifting technique.)
 
*Sift 1 Cup sugar.  Set Aside.
 
*Put first flour/sugar mixture back into sieve.
 
*Beat egg whites to foamy.
(Foamy egg whites)


*Add 1-1/4 tsp. cream of tartar.
 
(This is where my mom told Mary she wasn't comfortable with measuring spoons and just used a regular spoon from a table setting.  Then she told Mary she rounded it too much.  We weren't comfortable with this measurement, but the cake turned out fine.)
 
*Beat to very stiff peaks.  Egg whites should stand up and not curl over.
 
*FOLD in the 1 Cup sifted sugar in four parts very gently. 
 
*Fold in 1 tsp. vanilla and 1/4 tsp. almond.
 
*Sift then fold in flour/sugar mixture in four parts.
 
(Folding is very important so you don't break down the egg whites.  Mom thought Mary's technique was a little less than perfect.  I heard "Don't be stirring at it!" at one point.)
 
*Put in angel food cake pan carefully.  Don't flatten the top.  Using a sharp knife cut around the cake and back and forth slowly to break any bubbles.
 
*Bake for 30 minutes at 375 degrees.
 
(Fresh from the oven)
 
*When the cake is done the top should feel "springy" and "spongy."
 
*Cool the cake upside down.  (If it falls out of the pan, you didn't cook it long enough.)  The cake should stay upside down until completely cooled--at least an hour.
 
(checking to see if it was falling out of the pan)
 
*Cut around the edges with a sharp knife to loosen from the pan.
 
(Mary's cake.  Tasted great!)
 
And just in case you didn't understand my directions, here's a picture of my mom's recipe card.  Seems like she left out some details AND one of the measurements is different than she told us today.
 

Beachy Shower Invitation

I was commissioned to make twenty-five bridal shower invitations, with the instructions to have a beach theme and maybe use blue and white.  Here's what I came up with:
I ran the front of the card through my Cuttlebug to get the polka-dot texture in the background.  The shells were cut on my Cricut.  "Bridal Shower" was printed on my printer, then punched out.  The palm tree was stamped.  The shells have glittery highlights:
I used the Copic Spica clear marker and followed the line created by the Cricut.  I think the invitations turned out nice.  I hope the bride liked them.

Friday, March 22, 2013

Pi Day Update

For those of you who didn't see at least a dozen Pi Day/Pie Day memes on Facebook, March 14 (3.14) was "Pi Day"--an excuse to eat and bake pie.  My office never being one to miss a treat day, we did it up right.  Here's a picture from the kitchen at the Court of Appeals on Pi Day:
 
And here's the white board above the table listing all the kinds of pies:
To clarify, pecan is different from quiche.  The quiche was a breakfast casserole/pie.  The very bottom is Homemade I.C. for ice cream.  My contribution was the key lime.  Our chief judge actually contributed the crock pot of Shepherd's Pie.  Seriously, I work in the best office, period.

Monday, March 4, 2013

Pie Month?

Official Pie (Pi) Day is March 14 (3.14--get it?) My office is celebrating Pi Day this year with a potluck of pies, plus pizza pies for lunch. (Yes, I work in the best office EVER.)  Anyway, we starting talking about pies and pi day, and I couldn't help but make one early, because as I've said before, I love to make pies. Here's my pie crust recipe from an earlier post, my easy key lime pie recipe, and a picture of some apple pies I made from my abandoned 365-day-project blog.
This is a chocolate meringue pie from my mom's recipe.  My sister was here for supper, and she gave it two thumbs up.  It's more of a pudding-type pie instead of a cream or French silk.  The original recipe was cooked on the stove top, but now my mom and I both use the microwave, and it tastes just fine.  Here's the recipe:

 
Chocolate Filling
 
Heat 2 Cups of Milk & 1 Beaten Egg Yolk in microwave until hot (not boiling).
 
Stir together 2/3 Cup Sugar, 1/3 Cup Flour, a Little Salt, and at least 1/4 Cup Cocoa.
 
Stir Dry Ingredients with Milk/Egg Mixture.  Heat in microwave until just boiling--stopping to stir every 45 seconds or so.
 
When chocolate mixture boils, remove from microwave and stir in 2 tsp. Margarine and 1 tsp. Vanilla.  Poor mixture into cooked, cooled pie crust.
 
Meringue (for any meringue pie)
 
Beat Three Egg Whites.  Add 1/4 tsp. Cream of Tarter.  Beat eggs to stiff peaks.
 
Gradually add 2 Tbsp. sugar and mix.  Do not over beat meringue.
 
Spread meringue on pie and bake for just a few minutes at 375 degrees, or until peaks of meringue just begin to turn brown.
 

Saturday, March 2, 2013

Drink Umbrella Wreath

A great wreath for summer decor or a party!  I saw something similar to this on Pinterest and decided to try it myself.  My daughter Jess ended up doing most of it for me--thanks, Jess!
It's a plain Styrofoam wreath base with the inner and outer edges covered in CTMH burlap ribbon.  I glued it in.  The umbrellas and fruit picks are simply stuck in the Styrofoam.
In lieu of a big bow, I used three drink more drink umbrellas and a little raffia for a focal point.
Although it's not a decoration that can stand up to any kind of moisture, I think it will be very festive on our deck this summer when we have any company over for island drinks.