Welcome to My Blog!

Hi! Thanks for visiting! If you have a blog or other favorite website you'd like me to check out, let me know! And, please, comment on my posts--I'd like to hear from you.
--Ms. Molly


Monday, October 21, 2013

Easy Chicken Pot Pie

 
Fall is here and so are those cravings for comfort foods.  My friend Lori made up this recipe for Chicken Pot Pie, and I love it!  I was going to go on here about what a fabulous cook Lori is, but now that I think about it, I've never actually eaten anything she has prepared.   She talks a lot about recipes and meals, so I can say she talks a great game.  (I'm 100-percent sure she's a great cook.  I know she loves it.)
 
Anyway, here are the ingredients for the pie:
 
Pie Crusts (2)  (purchased or homemade)
2-3 Cups Cooked Chicken
Frozen Peas or frozen peas and carrots or whatever vegetable(s) desired
Pepper to Taste
Teaspoon (or so) of Tarragon
3 Cans Country Fare Cream of Chicken Soup
4-8 oz. Cream Cheese (optional)
  
Cook the Chicken.  You can buy chicken already cooked, you can buy it and cook it yourself in the oven or on the cook top, but I like microwaving mine.  I have a pottery container (you can get one from Pampered Chef or, like me, get one for about the third of the price at Wal-Mart ).  Put just a little bit of water in the bottom of the dish and add chicken.  I usually use chicken tenders (the strips), but chicken breasts were on sale this week, so I went that route.
 
Chicken before microwaving.  Barely any water in the bottom of the dish.
Cook the chicken, covered, for approximately 8 minutes.  My dish has a lid, you just can't see it here.  One of the chicken breasts was pretty large, so I had to cut it into fourths and heat it an additional couple minutes.  If you use chicken tenders, 8 minutes is usually plenty of time--just cut into it after you cook it and make sure the pink is gone.  The chicken turns out very tender and juicy.  We make chicken like this all the time, and just add BBQ sauce or leave it plain.
Back to this recipe:  Cut up the cooked chicken into the size of chunks you like.
 
I'm including this picture so you can see the cans of Country Fare Cream of Chicken Soup.  I'm not sure if this is a local brand or not.  I know it's available in Iowa Hy-Vee stores.  If you don't have it in your store, you'll have to experiment.  Lori says it's a good consistency because it's between a gravy and a soup.
 
Heat one can of the soup and mix in the cream cheese.  (Avoid adding gourds--they're just in the background.  I should have moved them.)
 
Mix all the pie ingredients together:  chicken, heated soup and cream cheese, vegetables, tarragon, and pepper.  It looks like this:
Note to self:  use a bigger mixing bowl next time.  You'll notice my mixture now has corn in it.  Just before this picture was taken, things went bad in my kitchen.  I hadn't noticed that one of the cans of soup was actually cream of mushroom.  It kept itself hidden from me until after I opened it--even going so far as to hide in the back of the picture of the soup so I wouldn't notice.  After I opened the can of mushroom soup, I went to my pantry thinking I was all smart in the kitchen and grabbed a can of creamed corn to substitute.  I opened that can, then discovered it was regular corn, not creamed.  Believing all cans were scheming against me, I was lucky to at last open a can of creamed corn.  I only used about three-fourths of it, because it was larger than the can of cream of chicken soup called for in the recipe.  I imagine Lori is laughing reading this now whilst she has a healthy dinner in the oven, some bread dough rising, and perhaps some vegetable canning underway.
 
Pour the mixture into the prepared pie crust.  Lori heats her bottom crust for 8-10 minutes at 425 degrees to avoid sogginess before filling it.
In all honesty, I think if I  make another full-size pie, I'll just omit the bottom crust completely.  (I imagine Lori throwing up her spatulas in despair now.)
 
I used homemade pie crust, because it is my ABSOLUTE FAVORITE THING TO MAKE.  See my post on pie crusts HERE
 
After you add the filling, put on the top crust and trim to fit.
 
Crimp the edges and add some slits for steam to escape.  I'm a weirdo, so I made mine look like chicken tracks:
 
Bake for 40 minutes at 400 degrees.
 
And here's the finished pie again:
 
My serving wasn't quite so pretty, but it tasted wonderful:
 
FYI:  This is a small sized plate--I did not eat half the pie.
I will definitely make this chicken pot pie again.  I'd like to get some individual-sized pie pans and make them that size and maybe even freeze them.  Try this recipe.  Hopefully, I've bolded the real important parts of the instructions, and hopefully your canned goods will cooperate.
Thanks, Lori, for the recipe!  And thanks for giving me permission to blog it.  You're welcome as a guest blogger anytime! 

Sunday, October 13, 2013

Buzz and Bumble Thank You Card

Someone I work with gave me some fresh honey last week, and I have all these "bee" papers and stamps, so I thought it would be fun to make a bee-themed thank you card.
I used b&t papers from CTMH's "Bee and Bumble" paper pack with CTMH Cocoa, Sunset, and Cashmere cs.
I random stamped bee from the "Bee and Bumble" Workshop on the Go stamp set on the Cocoa cs.  The little bee and his flight path on the lower right are from a zip strip on one of the papers.  I couldn't find a "thank you" sentiment stamp I wanted to use, so I free handed it.  All edges are distressed with brown ink.
I also added a piece of the bee b&t paper to the inside of the envelope.
 
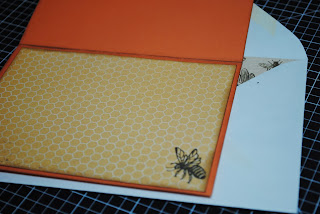
I really like the honeycomb b&t paper, but I didn't end up using it on the front, so I added a panel to the inside of the card and another stamped bee.
 

Saturday, October 12, 2013

Yellowstone Geysers Layount

First of all, I realize the pictures on this layout are not all actually "geysers," but that was a much better title than "geothermal areas," don't you think?
Anyway, I copied this layout pattern from Linda Rodriguez's layout titled "Tea Party" in the Creating Keepsakes book Fast Scrapbooking with 4x6 Photos.  I used the CTMH paper pack "Buzz and Bumble" because I thought the colors brought out the colors of the minerals in the photos.
The left page is pretty simple.  I used a zip strip from one of the papers and then cut a couple more strips the same size from another of the papers in the pack.  The flourish is from CTMH.
 
(That's Tom on the walkway.)
I used a CTMH alphabet stamp set that must have came with a special offer, because I can't find a name for it.  I can tell you it was not fun to cut out the letters.  Why didn't I use my Cricut for the title?  Because I'm not that smart.  I just don't use my Cricut that much, and the thought never occurred to me until I was half done cutting out the stamped images.  argh.
 
The journaling element idea was also taken from Linda Rodriguez's layout.  I used three tags and glued them together.   Then, I wrote across all three tags.  I altered my handwriting to make it look a little more vintage.  (I wrote short letters and stretched out the space between them.)  I distressed the tags with brown ink.  I didn't really have anything to journal about, so I described the different geothermal areas at Yellowstone.  I hope Wikipedia's info was accurate.

Another Yellowstone Park Layout

I love looking at all my pictures from Yellowstone.  I used black cs as my base for this two-page layout, and then layered it with a blue b&t paper from the CTMH retired "Lucky" paper pack.
 
I stamped the bottom of the blue b&t with black ink and a stamp from the Tim Holtz Visual Artistry collection.  It's the same stamp all the way across the bottom; I just stamped it at different angles and heights to make it look different.  The sentiment is from CTMH's retired "Happy Journey" stamp set.  The ribbon and butterflies are also CTMH.  The black bling flourishes are from Recollections.
 
I used dimensional adhesive on the sentiment to pop it up.  The butterflies are only glued down the middle so their wings pop up for extra dimension.
 
 
(I'm so glad we were lucky and saw a bear!)
The second page has some CTMH New England Ivy and Chocolate cs pieces. 
 
It's partially hidden, but I stamped a mountain scene with CTMH's retired "Beautiful Things" on the cs piece on the upper right.  I colored it with water color pencils and added just a little bit of sparkle with a Spica pen.  The white flower and black embellishments on this page are CTMH.  The grey centers of the flowers are from Recollections.

Tuesday, October 8, 2013

Halloween in Wonderland Shadowbox

The inspiration for this Halloween-themed shadowbox came from Pinterest, where I saw a shadowbox from the blog Meme's Art Place made using the same theme.
The papers are from Graphic 45 and are the "Hallowe'en in Wonderland Collection."  I've been hoarding the set for a couple years, so I'm not sure if it's still available.  I've seen similar collections with a Wizard of Oz theme, and those tempt me as well.  The tray/shadowbox is from 7 Gypsies.  The embellishments are miscellaneous finds from my stash.  I also used ribbon, Stickles and Liquid Pearls, and I edged a lot of the papers with Tim Holtz Vintage Photo Distress Ink by Ranger.
 
Some of the papers are flat against the back of the tray, and I glued some to the top for depth, and I like the shadows they make.  Here's a close-up look at my favorite--the creepy hand reaching toward the white rabbit.
 
And here are some other close-ups showing the various embellishments:


It's hard to see, but the pocket watch's face on the right is covered with shiny Stickles.

The Mad Hatter's bowtie and socks both have Liquid Pearl highlights.

 
This project was fun and probably only took 1 to 1 1/2 hours, mostly because the papers all matched so I didn't have to make a lot of paper/color decisions.