Another idea I saw on Pinterest. It's a simple shadow box, with an approx. 5 x 7 opening. I put a piece of Dessert Sand cs on the back and attached a Tim Holtz ticket with dimensional adhesive on which I stamped "admit one." I distressed both the background paper and the ticket. Then I just shoved some old tickets in the box, many of them you can't even see.
Welcome to My Blog!
Hi! Thanks for visiting! If you have a blog or other favorite website you'd like me to check out, let me know! And, please, comment on my posts--I'd like to hear from you.
--Ms. Molly
--Ms. Molly
Friday, April 20, 2012
Guest Book
My friend commissioned me to make the guestbook for her son's wedding. This is what I came up with:
The album covers are 12 x 12, and I bound it with my Bind It All. I used some different papers, flowers, metal embellishments, adhesive pearls, punches, stamps, ribbon, and beads on the cover.
The inside pages are 8.5 x 11, with room for guests' signatures on the right and a snapshot or two of the bride and groom on the left. All the pages have unique pictures and stamping. You can always see the outer edges of the inside covers when the book is open.
I had to add a little red because they're big Nebraska football fans.
The back cover has a stamp that says "...and they lived happily ever after."
Sunday, April 8, 2012
Jess's Wedding Shower
A few pics from Jess's first wedding shower yesterday: None of this was my doing, but there were were lots of fun crafty touches from the hostesses--my sister Mary, my sister-in-law Sandy, and my niece Heather--like the "Mr. & Mrs." banner on the wall, the monogram cupcake picks, and the personalized water bottle lables.
Jess is holding a little "cake" made with towels and utensils that her Aunt Sandy made.
Too cute!
Here's the card I made for Jess, using the cricut--which I've started using more and more. Her wedding has a lot of old bicycles in the theme, so I thought this went along with that.
She received two other handmade cards:
This last card wasn't handmade, but it's vintage and really cute. I might have to make some shower cards using it as inspiration:
Wednesday, March 28, 2012
Homemade Pie Crust
I'm not much of a cook or baker, mostly because I'm not interested, but I can make excellent pies and pie crusts. Tom wanted a cherry pie for his birthday, so I decided to take some pictures and blog my instructions for pie crusts.
My mom is in her 80s, so I'm going to assume Mamie isn't around anymore, and I won't have a weird old lady coming after me because I gave away her secret pie crust recipe. The ingredients are simple and probably the same ingredients everyone else uses:


I got my pie crust recipe from my mom. Her instructions are handwritten and say "Mamie's Pie Crust" across the top. I didn't know who "Mamie" was so I asked my mom. Here's our conversation:
MOM: Oh, remember when I taught at that [one-room] school out by Roman's Lake?
ME: No.
MOM: Before I was married [pre-1948] that school that was up on that hill? on that dirt road?
ME: No. I don't even know where Roman's Lake is. [I think it's a fictitious lake or the site of a dried up lake--I've heard of it, but only in stories pre-color t.v. It could be real, but my family makes references to now-nonexistent locations often.]
MOM: Well, the second year I taught there [probably at age 18], I stayed with an old woman named Mamie way at the end of that dirt road. She was a weird old lady, but she could cook.
3 Cups Flour
a Little Salt
1 Cup Lard (I use original Crisco in the blue can)
1/2 Cup Cold Water
"A Little Salt" to me means two or three good shakes from my salt shaker. By, the way, how cool is my Margaritaville salt shaker?
Here are all the dry ingredients together. I have never used lard like the recipe calls for. If you actually want to use it, by all means try it. I'm sure that's what Mamie used.
This is a pastry blender. Martha Stewart would tell you its the proper tool to use when mixing your pie crust. It cuts through the ingredients without mashing them together.
This is what I use:
This is a huge no-no in making any kind of pastry. The number one rule in making pie crusts or other pastries is to keep the mixture cool, so the shortening doesn't melt. Your hands are warm, so you shouldn't use them. You should use a chilled pastry blender. My mom taught me to make pie crusts using my hand as a mixer, and that's all I can use. I'm confident that's how Mamie did it too. In an effort not to break the rules as flagrantly, when I wash my hands before sticking them in the crust mixture, I rinse them in cold water, so they're as cool as possible. My mom didn't teach me this. Maybe that's why my crusts are better than hers.
The number two rule in making pie crusts is don't overwork the dough. You're not kneading it. You're combining it. I use my fingers to kind of sift the ingredients together, not the flat of my hand. As soon as the ingredients are all mixed, the dough will be crumbly. I can tell when it's ready by feel, and that's why I like to use my hands to mix it. Here's a picture of the dry ingredients all mixed:
When the crust is at this crumbly stage, add the 1/2 cup cold water. I make a small container of ice water, let it get really cold, then take my water from that. Mix the water in gradually, at least in two parts. Mixing again with my hand, or using a pastry blender if you're a purist, as soon as the dough will form into a ball like this:
It's done. Do not overwork the dough. If you overwork it, the crust will be tough instead of flaky. Divide the crust and put half of it in the refrigerator to keep cool until you're ready for it.
Roll out the bottom crust.
Use flour to keep your crust from sticking to your flat surface and your rolling pin, but wipe off as much as possible. You only need a thin layer to keep it from sticking. Your crust can be thin or thick and still be flaky, as long as the shortening hasn't melted into the other ingredients.
Here's my bottom crust and with cherry pie filling. I leave the edges long until I add the top crust. A little water around the edges will help seal the top and bottom crusts together. Also, if your crust cracks or you need to patch it, use a little water on your fingertips to fuse it together.
Here's the pie ready for the oven. I used a fork to poke holes in the top crust to let out steam. I also sprinkled sugar on the top crust.
Here's the finished, baked pie:
Tuesday, March 20, 2012
50 Sucks!
My sister-in-law turned fifty today, and that called for me doing something inappropriate, so I made her a "50 Sucks!" sucker bouquet. Look familiar? It's because I made my niece a 30 Sucks! bouquet back in December. These go together very quickly. It's just a Wal-Mart sundae cup ($1.97), a painted styrofoam ball, 50 suckers (or 30, or 40, etc.) and a sign. I stamped mine with a couple CTMH stamp sets and added some flowers and some raffia for a Parrothead look.
Tuesday, February 28, 2012
More Junk Album Workshops
My studio was a busy place last weekend. Two groups came over to make the paper bag junk albums, and Jess was home from college and worked on her Disney pages. Here are a few pics from the weekend:
Sonny taking a snooze under the Cricut.
Sandy, Hannah, & Maureen hard at work.
Jess working on a pool page.
Heather, Mary, & Kelly admiring their work.
Labels:
Cricut,
Jess,
Junk Album,
paper bag album,
sonny,
workshop
Thursday, February 23, 2012
A CU Inspired Card with Footloose
I've been home sick for a couple days with bronchitis--yuck. (CU'ers: The cold I had in Idaho turned worse after I got home--I hope I didn't infect any of you!) I've also been frantic to get to my studio to do some crafting since returning from CU. Unfortunately I can't craft and lay on the couch at the same time, and the couch has won. But, my good friend Cheryl was hospitalized last weekend, and I have to make her a card, especially because they wouldn't have wanted me to show up at the hospital in my state. Definitely calling upon ideas I took away from CU, here's what I came up with:
I love the Footloose papers and colors. I used them for the first time at CU in Sheila's class. The little flowers, flourishes, bling, & general layout look a little like Michelle L.'s tin. And Joy, although she wasn't a CU instructor, inspired me to get out my Cricut (along with all the other women who were easily cutting out shape after shape at CU). All the Cricut shapes (the labels, the flourish, & the butterflies) were cut from the CTMH Art Philosophy cartridge. And, what did Michelle N., inspire me to do?--this one will be obvious:
I added a pop-up to the inside of the card!
Pin It
Wednesday, February 22, 2012
Creative University - Part 3
The Charm Swap
Aside from a few yarn and macaroni necklaces, CU's charm swap was my FIRST ever experience making jewelry. I stressed about it from the day I signed up for the swap. Erin Grotegut organized the swap. Erin is a very talented artist. She also taught our CU jewelry class. Her blog, Inky Smiles, is HERE. The swap rules were to create an art charm and a filler charm within the theme "woodland fairy" and use no silver, only gold, bronze, & copper metals. We had to make ten of each style charm--one to keep and nine to swap with other CU attendees. I made a few extra, so I swapped a couple more after the organized swap.
Here was my offering to the charm swap. My art charm was basically a wooden disc with stamping and Modge Podge. I'll post instructions here soon.
This charm was made by Tahne T. It's a cute little wooden door. I'm pretty sure a gnome would live inside there. Tahne taught us the chain mail bracelet on my last CU post.
This set was made by Diane K.--a beautiful little fairy in the frame plus an owl filler charm. I love the colors and the art nouveau feel.
These two charms were made by Melody P. Her charms match her background so well I don't want to detach them! Melody also has a cupcake business and brought along some very tasty cupcakes to share at CU. And, when I forgot one of my bags at CU, Melody was kind enough to deliver it to me in Spokane. Thanks again, Melody!
Tamara W. made this set. It's a little hard to see in the pic, but the colors are also awesome. The little tag from the fairy charm says "believe." Tamara was one of us "downstairs" gals, and I really enjoyed her and her sidekick, Kim.
Aside from a few yarn and macaroni necklaces, CU's charm swap was my FIRST ever experience making jewelry. I stressed about it from the day I signed up for the swap. Erin Grotegut organized the swap. Erin is a very talented artist. She also taught our CU jewelry class. Her blog, Inky Smiles, is HERE. The swap rules were to create an art charm and a filler charm within the theme "woodland fairy" and use no silver, only gold, bronze, & copper metals. We had to make ten of each style charm--one to keep and nine to swap with other CU attendees. I made a few extra, so I swapped a couple more after the organized swap.
Here was my offering to the charm swap. My art charm was basically a wooden disc with stamping and Modge Podge. I'll post instructions here soon.
And here are the other creative ladies' charms. When available, I've linked their blogs with their names so you can check out their other fabulous artwork.
This is from our charm swap leader, Erin Grotegut. Awesome! There's a tiny little dry dandelion inside the bottle to make a wish on...I think I wish I had as much talent as Erin.
I swapped twice with Linda S. and got these two sets. Look how creative she was to make that toad stool on the far right with two beads. Linda sat behind me in the cropping room--she's a sweetheart, even when she's tiring of making angry bird cards.
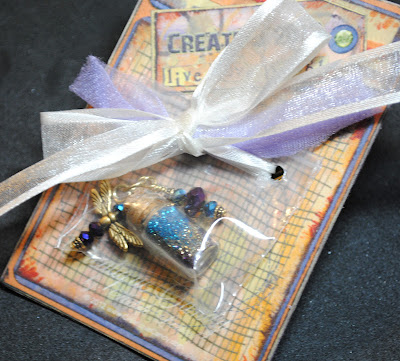
Nichole L. is the artist behind these charms. I love the fairy dust! And her base card is adorable too. I'm glad I took pictures of them all before disassembling them. Nichole took hundreds of pictures at CU. I can't wait to see them. I peeked at some of her projects on her table, and they were amazing.
This very creative charm was made by my good friend who I've known since the 3rd grade, Robin G. She was worried it wouldn't be good enough. Ha! It's adorable, and she made it from a real puzzle piece. Robin helped me a lot with my charms and taught me how to wrap the ends of the head pins to get me started.
Another example where the photo doesn't do the charm OR the card justice. This set was by Lisa S. I enjoyed meeting Lisa and her mom, Linda. Both are very talented women. When I got home one of the first things I did was order some of the watercolor paints Lisa was using at CU.
This cute dragonfly and "believe" charm is from Darlys R.. The photo is a little blurry, but her charms and card are beautiful. I'm absolutely in love with the dragonfly.
Both of these charms are pretty enough to be the art charm of the set. Bobie G. is the artist. She used resin for the charm on the right, which I'm too scared of to use. Hanging off the top of the left charm is a little acorn. Too cute!
Lastly, here is the set by Lisa T. How creative that Lisa made a fairy wand? And her blue fairy charm on the left is gorgeous.
Those are only the charms I got. There were many, many more involved in the swap. I'm not sure yet if I'm going to make a bracelet or several necklaces. For now, I might hang them up in my studio, still on the cards, so I can admire them.
Here are a few more pictures from CU:
| Traveling buddies: Jeannie W., Molly, & Robin G. |
| Melody getting a flower painted on her arm by Tresa Black. |
| Traci & Olya |
| Robin & Joy |
What an amazing weekend!
Subscribe to:
Posts (Atom)